Work about early photographers and comparison.
Large format cameras + Julia Margaret Cameron.
Medium format cameras.
More research.
Proposal.
Test shots.
Final shots.
Develop shots + Evaluation.

Firstly I decided to have a look at my favourite photographer Tim Walker.
Tim Walker is a well known fashion photographer for Vogue, who's work is regularly featured. What catches my eye about his work is the elabourate set ups that he creates from putting dresses in trees to having a lady in a room full of rabbits, I love it I think it's fantastic. This is one of my favourite photographs by him. To me it shows that for something to be considered fashion it can be anything taken artistically in someone's eyes, even a lady dressed like a black peacock in a room that's full of decay. We discussed in class what we though fashion photography is. To me I think fashion shots are seen as images of people that are taken artistically. A shot of a model in a fashion magazine with no clothes on, would still be considered fashion in the right context, in the magazine.
 For example this image of Miley Cyrus that was taken for Vanity Fair magazine would be considered a fashion shot despite the fact their isn't any technical fashion, etc clothes, in site. So actually in my opinion I think the idea of a fashion shot depends on where the image is used too. A nicely lit naked picture of a woman can sell perfume in one magazine, but without that lighting and context it becomes just a nude shot, and not fashionable. In early photography times fashion shots were used for clothes advertisement but that changed and it's slowly become less about the actual items that are being sold, more of the fashionable look and the lifestyle that the people in the photographs have. I think fashion photographs are a look.
  I next had a look at photographer Rankin. Rankin was known for his strong provocative, shocking and exotic images of women, that seemed to just show them as objects. Most of his fashion photographs of women mostly show their legs, and if showing their faces they're not the main focus, the main focus of the image is for you to see the woman as an object first, then realise the legs are actually attached to someone. Despite the quite negative few towards women that are put across in his images, they're still fashion shots and you could still imagine them in a magazine advertising something, and people would still be attracted to them.
 Early Photographers
 George Washington Wilson
George was a famous pioneering photographer, he became the most well known photographer in Scotland who also gained a contract to photograph the Royal Family working for Queen Victoria and Prince Albert in 1860. He started work as a miniture portrait artist in 1849, but then in 1852 ventured into photography and setting up a studio with John Hay. He helped greatly in developing techniques of photography outside the studio and into work producing mass photographic prints. During his life his business became very successful, at the end of his life he passed his business down to this two sons, they employed 40 staff and the business became one of the largest publishers of photographic prints in the world. The business was kept alive until 1908 where it was all sold at auction.
Georges photographic plates still exist today, over 40,000 still exist today. They survived the test of time because of his great attention to detail with the chemical processes that he used. Here is an example of one of his portraits called 'The old Gardener Simpson...and his wife'
 This was taken in 1854. The photograph is a Albumen Print, which was invented by Louis Desire Blanquart-Evrard. The Albumen process is where a 100% cotton piece of paper is dipped into egg whites and salt, then left to dry. Then the paper is made light sensitive by dipping it into silver nitrate then dried without exposing it to UV light. They take the glass negative that used a collodoin emulation, it is then places in a frame on top of the paper with a frame in the dark room, this was then exposed to light that produces a image on the light sensitive paper. the image is then fixed with sodium thiosulfate. Gold of selenium is then optionally added to the photo because it improves the photographs tone, and protects the image against fading. Here is a picture of the slides we had a look at in class. There are positive slides, to make these, the negative would have been places against another photosensitive piece of glass and it would have been exposed in the same way as the paper, so then you're left with a posative photo on a piece of glass ready to be projected onto something. The images used to be projected onto a wall/screen using a lantern.
  Here's some more of George's work done with the Albumen process, we got to look at the slides in class over a light box. I'd consider his studio portrait style pretty traditional, with quite serious and posed photos. But with his work on location, is really interesting I think although the people in the photos still had quite serious expressions on their faces, they were photographed in situations that defined what they did and how they lived their lives.
  I found a website called the National Portrait Gallery that had archived quite a few portraits that George had taken. This ones my favourite one that I found on the website the photograph is called Mrs Grant and was again a Albumen print and was taken in 1857. I love the composition of this photograph with the strong contrast between the white walls and the dark hall way, and the old woman sat on a chair in the middle of it all. She has such a serious expression, but it's works fantastically along side the dingy and grungy looking place she's photographed in. The style of imagery that George Wilson produced was quite serious portraits of people, with dead pan expressions on their faces be they in the studio or on location. In the location shots, their surroundings spoke for the person to describe what they did/who they were, there wasn't any need for strong expressions in their faces.
Napoleon Sarony
 Sarony was a very fell known portrait photographer, his most well known work were his portraits of theatre stars in the late 19th century. Before his career in photography he started off as an illustrator then he started a lithography business with James Majoy. In 1867 he opened a photography studio at the time when celebrity portraits were really popular. At this time Photographers would pay celebrities high amounts to get them to pose for them, they then held the full copyright to the photographs. Sarony was reported to have paid $1,500 to get stage actress Sarah Bernhardt to pose for him.
  This is one of his photographs of Oscar Wilde, this photograph was taken in 1882, these were also done as an albumen print like the previous photographer.
 Napoleons photograph of William T Sherman was used as a postage stamp too. Napoleons style of photography still fitted with the traditional portrait style with a serious expression on their face, but his location shots got the models and celebrities in different poses. It was quite a forward style for the time as photographers at that time usually just stuck to people stood straight or people just sat down with no poses.
Comparing Wilson and Seronys work I would say that although they both took photography out of the studio I think Serony moved away from the more predictable poses of that time. This can be seen with Wilsons image of the old woman in her doorway, and then In Seronys image above of Oscar Wild. His pose is quite casual compared to the usual formal style of photography around then. When comparing their studio work I think they're both share quite a similar style. The only difference that I could pick out when comparing their work is that when photographing people in his studio Wilson got his models to look at the camera, where as in Seronys work the models seem to be staring off into the distance. I think Wilsons work takes more of a formal approach to all of his work, where as with Seronys work he started to explore more creative poses in his work.
Before we start properly planing the research for our final outcomes for this project we have been exploring different studio techniques with the rest of the class.
In one of our lessons we had a look at different lighting that we could use for our final shoot. In this session we learnt about the beauty dish.
Here is the first image we took, after this we changed the set up to our own personal preferences. To get the light even on Danielle we had to have the beauty dish set up right infront of her pointing straight at her face, meaning the photograph had to be taken from the side of her, which was quite difficult.
.jpg)
After this photograph was taken we decided that there needed to be more light on the right side of her face, so we got a massive piece of card and used it as a reflector, this angled right lit up her face evenly.

After us all being happy with the lighting on her face we decided to do something about the background. We added a light pointing directly at the background which turned it white.

Next we decided to try out a black background not using the spot light on the background.

Because there was no light shining on the background of the set it went perfectly black, the only last change that needed to be done was a light onto her hair, because she has quite dark hair, it blends into the background easily, so a light shining on the top of her hair brings her out of the background.

The next project that we had to have a go at was recreating the lighting from a Rankin photograph of the lady holding the snake.

Using a scarf as a snake we got Danielle sat on a chair and had a look at the photograph to decide where we though the lighting was. We decided that the light was coming from above in the photo and got two lights and experimented with them moving them around to see if we could get the right lighting on her shoulders and cheek bones and hand.
Here's a contact sheet of all the photos we took when moving around the lights.

Here is the final image that our teacher edited. I think the lighting was pretty accurate, the only problem is the background, on the original the bottom of the photo faded from white to black.

Hasselblad 6x6


In yesterdays lesson we used a Hasselblad 6x6 camera to take photos both in the studio and outside. We used a light meter for the F number, the film we used was 400 iso and we took the photos at a 125 shutter speed. We for the studio worked mainly used the F number of around 8, but this had to be adjusted to where we moved the continues studio lights. I really enjoyed working with this camera, with the help of a light meter it was easy to set up to suit the situation you were in. The only problem I has was it was quite hard to focus quickly, I found myself having to stand there for a minute trying to work out exactly where the image was in focus. I think because of this it made you extra careful about taking the image, making sure that you'd got it perfect before you pressed the shutter. We only had 12 frames too to use with this film, because of this I think it makes you think so much more about the images you're producing, making sure the lightings perfect, and the focus before you press the shutter. Although the process of this film was slow, having to wait such a long time between taking the photo and having a physical copy of the image I strangely enjoyed it, it was far more exciting than just plugging a memory card into the computer and being flooded with thousands of similar images. There were restrictions to using this camera, not being able to just take a quick shot of something and having to set everything up made it quite restricting, but it made you fully think about what you were going to produce. Because of this, each image that we took we used the light meter to get the correct settings for the light situation and had to think greatly about each shot.
We developed the film first by putting the film into the dark bag and getting it onto the spools and into the processing tank
we first used 295mm of water mixed with the same amount of developer at 20° then after that using 590mm of fix, then washing the film, then drying it out.
here's a scan of the negatives. Sadly one of the negatives didn't work out correctly because, we got told this was because in the film processing tank the film was touching, and also we lost two frames because we accidentally wound on the camera too much.

We next went into the dark room to make a contact sheet of all our images
First we created test strips to work out how long to expose each of our images. We decided to do at least two test strips, one for the images taken inside in the studio with continuous lighting, and then another test strip for the images that we took outside.
Here are the test strips.

From these test strips we worked out how long each photo needed in the enlargers.
The outside photos needed [check!!!] seconds
and the studio photographs needed [check!!!]
With this information we created two contact sheets.


How you approached the shoot?
Because we'd not used these cameras before, and weren't used to using them we wanted to take a fun approach to using them at first. So after getting used to all the settings and taking some happy photos of us all, we did take some serious photos that I really do like.
Here are the two I'm really happy with.

I really do like how Danielle is posed in this photograph, she looks really vulnerable, I think we did good with the lighting in this photograph also even if her shoulder is a little bleached out by the single light on her.

I also am really happy with this photograph, it ended up being quite under exposed, but I think it works really well for the deep thinking pose and look that Danielle did in this photograph. Even though seen as imperfections I actually quite like the scratches on the picture made by the developing tongs, I think it works well with the graffiti background. I also like how she's not in the centre of the photograph.
Also looking at the other photographs we took, I really think we got the lighting correct on this photo. I think it worked out great. I think it works so well because even though Ashleigh is wearing really dark clothes, they still stand out against the black backgound, as it is sometimes quite easy to loose dark coloured things in a dark background without a spot light.

In the 60's smaller more portable cameras were being produced which mean the photographer could take the model out of the studio and work with their surroundings as a backdrop. The city backdrop heavily used in the 60s.
Some of the most influential photographers in the sixties were David Bailey, Duffy and Terrance Donovan.
Here's some of their work.
Here are some of David Baileys work.


I really like David Baileys work, I love the strong contrasts in this photos with the bright white background and the dark tones.
'I've always tried to do pictures that don't date. I always go for simplicity'
I think this shows really well in his photographs, because especially the first picture here I think looks like a really recent photograph.
The completely plain background in David Baileys studio portraits meant that the subjects in the picture were the complete focus of the image.
Bailey described himself as falling in love each time with the person he was photographing. Looking at the portraits he took, I think you can see this, the person is looking into the lens, and I think they feel quite intimate.
One of his most favorite photographs is probably the one of Mick Jagger.

The next photographers work that I had a look at was Terrance Donovans.
Here's some of his work.
Here's some of his work.

Here's an example of what I said before when a compact camera made it possible for photographers to move out of the studio.

Terrance Donovans work reminds me alot of Baileys work with the strong contrast of black and white, but instead of just a plain white background and keeping to that theme like bailey, Donovan took his creative ideas a bit further.
The first image that I put above is my favourite picture by Donovan, I think it's a really emotive portrait, and I think you get a feel of what the persons emotions are by looking at the image, this is what I would like to do with my images, to be able to tell what the person is like by my image.
I lastly had a look at Brian Duffys work.
Here's my favourite photograph of his.

I love the crisp focus on her eyes, and how clean this photograph looks, I will aspire to create my photographs to this level of quality as I think this photograph is beautiful.
The three photographers that I talked about above were very influential in the 60s, they became known as the Black trinity. They were the photographers who were most famous for photographing the swinging London by photographing the famous models, actresses and musicians at the time.
The swinging London was a term first used by TIME magazine. During the swinging sixties Model Jean Shrimpton, who famously was engaged to Bailey, became such a sixies icon, becoming the most photographed model of the sixties.
Here's a photograph of her and David Bailey.

Also during that time the use of the union jack became popular, in this photograph it was used as a background by photographer Terrance Donovan with model twiggy.

During the sixties Twiggy also became very popular, she was named the face of 1966.
With this research complete the references I would like to make to other peoples work is the clarity of Brian Duffys image that I posted, and the way David Bailey and Terrance Donovan captured the persons personality in their photograph on a plain white/grey background. Also have the strong contrast look of their images.
I unfortunately wasn't in class when they studied the large format cameras so I had a look for myself on the internet how they worked and for some examples of work.
large format refers to any imaging format bigger than 4x5 inches.
 I watched a video on youtube called 4x5 photography where they showed you loading one piece of film at a time into the camera. The camera they did this example with is a Grayflex crown graphic camera. To load the film you place the film in the film holder in complete darkness. It said to make sure there wasn't much dust on the negative holder so it's best to clean it off with a soft paintbrush so there's no dust on the negative that will block light that will effect the final photograph. As well as using film, photographic paper can also be put into place of film when taking an image, then a contact print would have to be made of this to create a positive image. You would have to develop the film the usual way, but with the photographic paper negative you would just put it into the dev, stop, fix trays in the dark room for an image.
Here's an example of a paper negative and then the positive image that I found on the internet.
A photographer and an example of their large format camera work is Timothy Greenfield-Sanders, who's an american portrait photographer. His portraits are taken in incredible detail. “I look at these prints and I don’t see photographs,” said Greenfield-Sanders. “I see the incredible personalities I had the privilege of photographing as if they were standing there again in front of my camera.”
I found this quotes on one of the websites about him, and it was such an inspiration, I think you can definitely feel the personalities of the people that he photographed beaming off the page. Like this image of Bill Murray. To me this image screams his funny and mischievous personality that we see in films.
From the research about this photographer, I have definitely been inspired to try and produce images that feel like you're meeting the person, and their personality is presented to you.

Another photographer that we looked up in class is Julia Margaret Cameron, who was a british photographer, best known for her photographs of celebrities at the time. Although sadly at the time her work wasn't given the recognition it deserved, it has inspired modern photographers greatly. She is best known for her close up portrait images like this. I do think the close up feel to all of her images make them personally feel more intimate, like you're being let in close to the person she was photographing, and how they felt and who they are. Though looking at different images that she created, they don't give off a happy feel, most of their facial expressions are quite mournful and are in quite soft focus.
Proposal.
Originally I'd been inspired to create work in the style of David Bailey and Terrance Donovan, to create high contrast shots of people in the studio. I wasn't really sure what direction to go in around the style I want, so I kept researching photography from the sixties, then came across this image.

I instantly decided that I had to do something like this.
For this shoot I have decided to use a Hasselblad with 6x6 film. I chose this camera because of the square negatives.
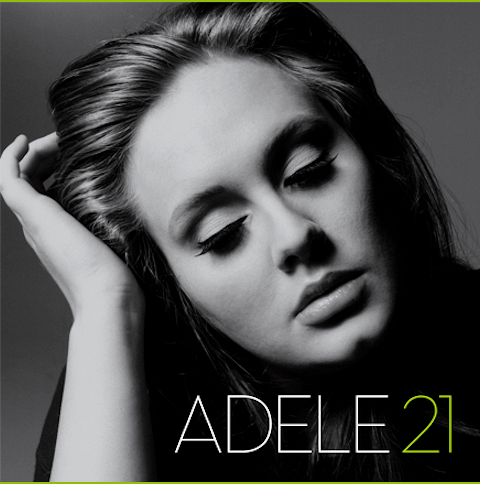
For lighting my portraits I will use two lights evenly lighting the grey background and one light pointing down on my models. The harsh lighting high up creates dark shadows on the models face giving them the look of strong facial bones and it also makes the models face appear thinner.
Here's another image taken recently with similar lighting in this album cover for Adels album 21.
Here's the studo set up I plan to use for the photoshoot.

What resources will I need?
Studio with two soft boxes
Digital camera and medium format camera with film
Dark room, chemicals, enlarger, photographic paper.
Who to photograph?
I wasn't sure yet who I'd like to photograph yet, I wanted to definitely get peoples personality's across though.
I had a look at different photographers who'd picked different groups of people to photograph and why.
 Here's James Mollisons work, James photographed a set of photographs called the Disciples where he went outside concerts and took photos of the groups of people who were going to see the different gigs, he did this over 3 years. After looking at his images, which I do like, but I don't think they show enough individual personality about the person. They just group together the people into the personality of the group that they're going to see. I wanted to do something alot more personal to each individual like the david bailey and avadon images. So I found around 6 of my friends who I feel have alot of individuality about them and who I feel present this individuality through their clothes and mannerisms this is what I want to be able to capture in my images. The feeling that they're in front of you, like with Timothy Greenfield-Sanders work. I have arranged all my friends to come to the studio at staggered times.
Since I'm doing my final shots in film I decided that I'd take some test shots with my DSLR Here's a contact sheet of the images I took.

I took some of the images in black and white so I could have an idea of what they would look like in film. 

Above I edited my favorite image, then below I've cropped the image to get an idea of what my final pictures will look like because the film is square.

Considering this is my first set of test shots, I'm really happy with how the lighting came out with this.
Here's another shot of my friend Ashleigh that I took with the same lighting, because the lighting was set up for Toms photo before, it wasn't as harsh lighting as it was with this photo, but I'm still really happy with this image.

For my final sets of images I have decided that I want to have six different images of people.
Tomorrow in college I am going to book the studio out for my final photographs.
From the critique in class today with my two test images the conclusion with my project is that I need to keep the same lighting set up through out the shoot, but instead of a dead pan expression for the person to bring out their personality in their portrait. I intend to take a serious dead pan portrait, but then with a couple of other shots of each person try and express their personality.
Today I had my shoot.
I wasn't allowed to take out the camera I had planned to used, but I got to take out a similar one.
With the camera settings F22, ISO 400 and shutter speed of 125 I took my shots in digital as well as on medium format film.
Here's my contact sheet for all the images I took.
(upload picture)
I took some serious pictures of the people, but decided quickly that the character showing shots were the way to go.
1 2
2
 2
2
3  4
4
 4
4
5  6
6
 6
6
7

I am really happy with my images, and can't wait to develop them on film tomorrow
the only two that I don't think I'll use in my final project, even though I think they're nice photos, are 3 and 4, I don't think they express the persons personality enough, as much as the others do.
the only two that I don't think I'll use in my final project, even though I think they're nice photos, are 3 and 4, I don't think they express the persons personality enough, as much as the others do.
Tomorrow I am developing my film and printing my images
I will upload pictures of the scanned photos and negs.
I will upload pictures of the scanned photos and negs.
Today I developed and printed my images.
Here is a scan of my contact sheets.


 Testing times for images.
On the top image in the set to the left the exposure of the image was corrrect but we were trying to burn out the sides of the image to create a more black boarder, but it caught my image so I had to redo it. The picture underneath was an image I did before my final print of this picture, I'd put the timer on the enlarger for two long causing the image to darken too much.
 On these next images on the first one I thought I'd got everything correct but as soon as I'd finished processing it I went to go look at it and there was something on the image, a big line, maybe some dust or a smear on the picture so I had to reprint this image. On the image below it was the same as the bottom image on the set above where I'd put the enlarger time on for too long and the image went too dark, from this I corrected the time and got the correct settings.
After choosing my final photographs I printed the final images using 1.5 seconds, a 170 magenta filter and using F16.
Here's a scan of my final images.

These are my two favourite images. I think they're the ones who represent the people the best and I'm really happy with how they were printed. The only problem I could pick is that there's a shadow in the background but this was because I only had one light to light up my background with due to fuses going in the studio lights, but other than that I'm really happy with the pictures.
here's the other final images.
here's the other final images.

This next set I think did well, but the printing quality wasn't as good as with the first set of images. I am getting to reprint the ones that didn't go as well next week, so I will definitely look over these ones, I think the top image needs less magenta contrast, and the bottom image more because it's quite grey scale, but despite the printing quality I think the poses and characters of the people shines through.

I am happy with the poses of the people in the photographs, but not happy with the printing quality of these images at all. Next week I intend to re print these to achieve a better quality image.
Evaluation.
From this topic I have learnt how to use both large format and medium format cameras, something that I've never used before, but greatly enjoyed, I also learnt how to print and develop medium format negatives. I have also learnt a great lot about photography over the years and about the influential photographers of the 60's especially. They really inspired me to created strong contrast character head shots. I think that this shows in my final images, especially the first two which I'm really happy with. I think I've managed to show the development of my ideas through my annotation of my research through out my coursework. If I were to do anything different I would have more practise on the enlargers and make sure I knew how to correct the different little problems that I had with ease. I'd never used the magenta filter on any of my prints before, so I'd learnt this useful tip from this project and this worked very well as my photos were aiming to be strong contrasty images. Due to people cancelling and lack of people willing to come in I maybe didn't get the amount of different characters that I wanted in, and despite problems with the studio I am happy with the work that I produced in that time and with the circumstances. Next week I am going to reprint my final images and make sure I'm happy with them, and I'll upload them on here when I'm done, as I am happy with the final pictures, I just think some of the printing lets the images down.